Well, I found a solution in the book Artisan Bread in Five Minutes a Day. I know what many of you are saying...this book has been around for several years now. I know, and I have no idea how I am just now discovering it, but I am so glad I have.
 |
| A free-form loaf slashed with three scalloped cuts on top. |
One other great thing about this dough is that you can continue to use the same storage vessel for mixing new batches, and each time you do the flavor of the dough will deepen due to the bits of leftover dough that get mixed in to the new batch. After several batches, you have a dough with a much more developed flavor, all without the need or use for a starter.
 |
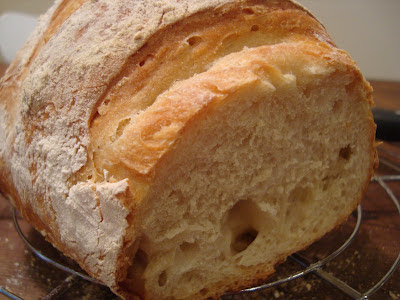
| The inside of the finished loaf has a nice, chewy texture. |
This dough is also very versatile, allowing you to make all sorts of breads without mixing multiple batches. With the master recipe I have made free-form loaves like the one pictured above as well as baguettes and pita. It is fabulous to be able to have a loaf of bread when I want or need one without a trip to the bakery.
 |
| Part of a baguette made with the same dough. The baguette does not get dusted on top. |
 |
| Pita made with the same dough. The pita is rolled thin and then puffs as it bakes. You do not need to add water to the broiler pan when making the pita as you do not want it to get crusty. |
Below, I am only outlining the basics of the Master Recipe and how to form a free-form loaf. For more information on this recipe visit Mother Earth News, or visit Bread in Five for more dough and loaf types.
Five Minute Bread- makes enough for four 1 pound loaves
adapted from Artisan Bread in Five Minutes a Day
To make this bread, you will need the following ingredients as well as a pizza stone, pizza peel, and the bottom portion of a broiler pan.
3 cups lukewarm water
2 packets active dry yeast (1 1/2 Tbsp)
1 1/2 Tbsp kosher salt
6 1/2 cups unsifted, unbleached all-purpose white flour
cornmeal for dusting pizza peel
Mixing and Rising the Dough: Place the water in a large bowl or large plastic food container with the salt and yeast. You do not need to let the yeast sit for any period of time before adding the flour. Add the flour to the water and yeast. Use a wooden spoon to incorporate the flour. If it becomes too difficult, wet your hands, and finish mixing manually. Cover the bowl with a towel or lid (not airtight) and allow the dough to rise for 2 hours until the dough has risen and is beginning to flatten on the top. At this point, the dough is ready to shape or store. It is a little easier to work with if it has been refrigerated for a day before the first baking.
Shaping the Loaf: You will not need to knead the dough before shaping. Instead, when ready to make a loaf, simply cut off a 1 pound piece of dough and shape it into a loaf by stretching it and turning the ends under to create a ball of dough. The ends will all be bunched under the loaf which is fine, but the top should be rounded and smooth.
Slashing, Dustin, Resting, and Rising: Sprinkle cornmeal on a pizza peel. Place the shaped loaf on the pizza peel. Liberally dust the loaf with all-purpose flour. Using a serrated knife, make several 1/4 inch deep slashes in the top of the dough. Allow the dough to rest on the pizza peel for 40 minutes. The dough may not rise much during this time, but it will rise more in the oven. About 20 minutes into the rising process, place your pizza stone on a middle rack in the oven. Place an empty broiler pan on another rack. Heat the oven to 450 degrees.
 |
| This loaf was dusted and slashed in a tic-tac-toe pattern. This is a picture of it after rising. |
Storing the Dough: Keep the dough in a covered but not airtight container in the refrigerator for up to 14 days, cutting pieces of dough out to shape, rise, and bake when needed. When you are ready to make more dough, simply mix the new batch in the same, unwashed bowl, mixing in the older bits of dough into the new.
Printable Version


No comments:
Post a Comment