Wednesday, August 31, 2011

Chicken and Vegetable Tostadas...A Way to Use Salsa Verde

Several posts ago I promised to tell you about one of my favorite ways to use salsa verde- chicken and vegetable tostadas.  I recently made these using roasted salsa verde that I canned, but they can be made using store-bought salsa verde with great results.  Either way, these tostadas are a perfect supper this time of year since they are chock full of zucchini and corn which, at least in my neck of the woods, can still be found at the market in abundance.  I have to warn you that this recipe is not "gourmet" or fancy in any way, shape, or form.  It is simple, everyday weeknight fare, but it is good and it is fairly healthy.  So here goes.


The filling for this recipe can be used in two ways.  You can use it to make the tostadas, or if you don't feel like going as far as toasting the tortillas, you can simply spoon the filling into soft flour tortillas and enjoy as is.  I prefer it in the form of a tostada because I like the crispy texture and slightly charred taste that come from broiling the tortilla. 

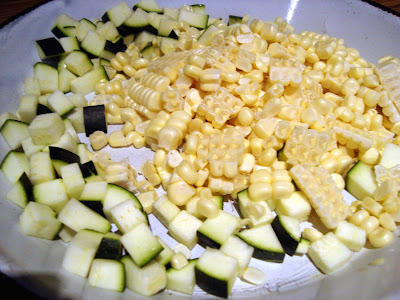
It begins with chicken that is cut into small chunks, seasoned with cumin, and browned in a skillet.  Zucchini and corn are then added along with some salsa verde.  After several minutes of cooking, the mixture is placed on a flour tortilla that has been under the broiler for a short time making it slightly crisp.  Cheese goes on top, and the whole thing is put back under the broiler to finish it up. 


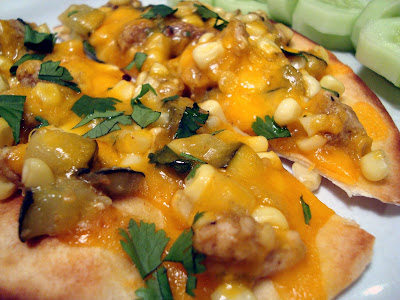
When the tostada comes out, it is crunchy, browned on the edges, and topped with gooey melted cheese which is holding all of the vegetables in place.  Sprinkled with a little chopped cilantro and cut it wedges, it is ready to eat in less than 20 minutes which is perfect if, like me, you tend to be a little lackluster in your desire to cook on weeknights.  I like these served with beans or (as I did several nights ago) with chilled cucumber slices doused in vinegar. 


I will also give you a heads up and say that if you try these and like them, you should stock up on zucchini and corn to freeze so that they can be made throughout the winter.  I chop zucchini and corn and freeze the correct amounts together in a freezer bag.  When I want tostadas, the vegetables are ready to go with no prep at all.  The filling is also delicious without any chicken.  Just increase the amount of veggies and add the spices directly to them in the skillet.

Chicken and Vegetable Tostadas (adapted from Cooking Light)
makes approximately 4 tostadas

1 teaspoon ground cumin
1/4 teaspoon salt
1/4 teaspoon black pepper
2 teaspoons canola oil
8 ounces chicken breast, cut into small pieces 
1 1/4 cup fresh corn kernels (about 2 ears)
1 1/4 cup chopped zucchini (about 1/2 a medium zucchini)
1/2 cup salsa verde (homemade or store-bought) 
3 tablespoons chopped fresh cilantro, divided
4 (8-inch) flour tortillas
Cooking spray or more canola oil
1 cup shredded cheddar cheese

Preheat the broiler.  Heat 2 tsp canola oil in a skillet on medium-high heat.  Sprinkle the chicken with the salt, pepper, and cumin.  Place the chicken pieces in the skillet and cook 1-2 minutes until lightly browned but not cooked through.  Add the zucchini and corn and cook 2 minutes.  Add the salsa verde and 2 tbsp cilantro.  Stir to combine and cook until most of the liquid has evaporated.  Remove the filling from the heat.  

Place tortillas on a sheet pan and spray each one lightly with cooking spray (or you can brush them very lightly with oil).  Place the pan under the broiler for 2-3 minutes until the tortillas are lightly browned and beginning to puff up.  Remove the pan from the oven.  Spoon 3/4 cup filling into the middle of each tostada and spread it around.  Sprinkle each with 1/4 cup cheese and place the pan back under the broiler for an additional 2 minutes to melt the cheese and brown the tortilla.  Watch them carefully as they burn easily and quickly.  Remove the pan from the oven, cut each tostada into four wedges and sprinkle with the remaining cilantro.   


Sunday, August 28, 2011

Applesauce and Some Yummy Muffins

Yesterday Hurricane Irene pounded the eastern part of the US including the coastal region of North Carolina (the state in which I live).  I called my mom who lives a little over an hour from the beach to see what the weather was like and was told that it was windy, raining, and shingles were coming off the garage.  I felt bad for the people battling the storm, but I have to tell you that there was also a feeling of excitement that came over me.  My excitement was because, due to Irene, it was beautiful at my home in Charlotte.  The air was crisp, a slight wind was blowing, and it was sunny but not at all hot outside.  What does this type of weather sound like?  Yep, fall! 

Fall is my all-time favorite season, and while I was smart enough to recognize that the weather was a result of the storm miles and miles away and not a true changing of the seasons, it was still great to think that in a few weeks that type of weather would be here to stay.  To further my excitement, the farmer's market had a variety of summer vegetables along with winter squash, garlic, and apples which is a tell-tale sign that fall is almost here. 

Apples my mom gave me-  I am not sure of the variety
To celebrate the weather, I found myself in the kitchen shuffling through the cabinets trying to determine what type of "fall" treat I could make.  I decided on muffins made with applesauce and topped with a cream cheese-brown sugar frosting.  Before I get to that though, I am going to quickly show you how I make the applesauce that I used in the muffins.  

Several weeks ago, my parents' apples were ready to be picked.  My dad gave me two grocery bags which amounted to about 15 pounds of apples.  I decided to make applesauce.  We like applesauce with pork and roasts as well as in baking recipes in place of some of the oil.  When I got the apples, I started by peeling, coring and quartering them.  I put them in a bowl of water mixed with lemon juice to keep them from turning brown as I worked. 

Apples being prepped for sauce
Once they were all quartered, I put them in a large pot with just enough water to prevent them from sticking to the bottom.  They cooked until they were soft and easy to mash with a spoon.  Then I pureed them in my food processor until fairly smooth with some small chunks.  You could also use a food mill, but I think I told you before that I don't have one.  So sad.  Anyway, I then sweetened them to my liking using granulated sugar.  The apples I had were pretty tart (if anyone knows what type they are, please tell me), so I had to use a good amount of sugar.  If your apples are sweeter you can get away with less or even none at all.  

I ladled the sauce into jars, but when I had ladled about half of it, I spiced the remaining sauce with cinnamon so that I would have both spiced and unspiced sauce in the cupboard.  I will use the unspiced in baking recipes, and the spiced we will eat straight.  

Four unspiced pints and three spiced
The sauce was processed in a boiling water bath and has been in the cupboard waiting to be used for several weeks. 

So when the weather became so fall-like yesterday, I got in the mood for apples.  I remembered the applesauce, and decided to make the muffins.  These muffins are the perfect fall treat.  They are spicy, moist, a little nutty (like me), and are topped with a sweet creamy frosting.  They are really in between a muffin and a cupcake and could easily pass for either. To begin, you mix the dry ingredients in one bowl, cream some of the butter and sugar in a mixer, and measure out 1 1/2 cups applesauce (you can use store-bought if you don't have homemade). 

Yummy moist muffin being eaten by me
Once the ingredients are mixed together, you add the nuts, and spoon the batter into paper lined muffin tins.  The recipe will make 18 muffins, so if you have two tins, that is best.  If not, bake some, cool the pan, and bake the rest.

Unbaked muffins
Muffins cooling
While the muffins (cupcakes) cool, make the cream cheese icing.  The tricky part is keeping yourself from eating them warm from the oven or eating the icing by the spoonful.  If you make it to the point at which you can actually frost the muffins, pat yourself on the back and prepare yourself for the next struggle which will be keeping yourself out of the kitchen so that they last you a couple of days.  They are great for breakfast, a snack or dessert. 


Applesauce (slightly adapted from the Ball Complete Book)
makes 7-8 pints

12 pounds of apples, peeled, cored, and quartered
                  (in bowl of water with lemon juice to prevent browning)
water to prevent scorching
2 cups granulated sugar (you can use more or less to suit your taste)
4 tbsp bottled lemon juice
4 tsp cinnamon (if you want to spice the entire batch) or 2 tsp to spice half

Combine the apples with enough water to coat the bottom of a large pot.  Bring to a boil on medium-high heat.  Boil until apples are softened and easily mashed with a wooden spoon, 10-20 minutes.  Let cool slightly.  Place apples in a food processor and process until relatively smooth with just a few small chunks.  Return the puree to the pot and sweeten with sugar as desired.  The apples I had took 2 cups, but you can use as much or little as you like.  Add lemon juice and spices (if using) and bring back to a boil.  Ladle sauce into hot sterilized pint jars leaving 1/2 inch headspace.  Remove air bubbles, adjust headspace, and wipe rims.  Top each jar with a sterilized lid and ring and process in a boiling water bath for 20 minutes.  Leave in canner 5 minutes after processing time.  Remove jars to a towel to rest for 24 hours.

Applesauce Muffins (slightly adapted from Martha Stewart Living)
makes 18 muffins

2 cups all-purpose flour
2 teaspoons ground cinnamon
1 teaspoon baking soda
3/4 teaspoon salt
1/2 teaspoon freshly ground nutmeg
1/8 teaspoon ground cloves
8 ounces (2 sticks) unsalted butter, softened
1 cup granulated sugar
1 1/2 cups packed light-brown sugar
4 large eggs
1 1/2 cups homemade or store-bought applesauce (I used homemade)
1 cup walnuts, chopped
1 package (8 ounces) cream cheese, room temperature

Preheat oven to 350 degrees.  Line 18 muffin cups with paper or foil liners.  In a medium bowl, combine the flour, spices, baking soda, and salt and whisk to blend.  In the bowl of an electric mixer, place 1 stick of butter, 1 cup granulated sugar, and 1/2 cup brown sugar.  Mix until blended and creamy.  Add eggs to the butter mixture one at a time, mixing on low speed to combine.  Add applesauce and flour mixture and mix until just combined.  Fold in walnuts.  

Spoon the batter into the muffin tins, filling them 3/4 of the way.  Bake 18-20 minutes until a toothpick inserted into a muffin comes out clean.  Allow muffins to cool on a wire rack.  

While cooling, mix the remaining stick of butter, cream cheese, and 1 cup brown sugar until smooth.  Once the muffins are cool, frost with the cream cheese icing.  You will probably have extra frosting leftover.  Serve immediately or store in the refrigerator for 2-3 days. 
    

Wednesday, August 24, 2011

Spinach Feta Scones...Breakfast of Champions

All summer long I have been cooking, canning, and most recently, blogging.  Although these activities can be time consuming and even strenuous at times, they are nothing compared to what happens to me at the end of August every year.  I have not mentioned it before, but I am a teacher.  I teach elementary school and love it, but it is a lot of work.  As I write this, I am juggling things trying to get ready for the first week of school.  I have been running around like a crazy person setting up my classroom, planning lessons, and getting back into the rhythm that is my life ten months out of the year. 

I hate to admit that I did not cook dinner tonight (we ate at a local deli instead) due to sheer lack of energy and will power.  But I did make breakfast for tomorrow-  a breakfast that is easy, familar, very tasty, and one which should take me through the day until lunch.  Heck, at the rate I am going now, it may end up being lunch too.  I decided to take a little break from working to share it with you.


This is a brief post to show you my favorite scone recipe, and to tell you that if you have never made spinach and feta scones, you must.  Not trying to be bossy or anything, but they are awesome.  So just do it.  They are tender on the inside, crunchy on the outside, and full of cheesy goodness.   


I have been making these so long I honestly do not remember where the recipe came from, but I am sure that I have tweaked it so much that it can be added here with no fear of the copyright police. 

You begin by mixing the dough and patting it into a circle.  The dough will be chock full of spinach and feta but should come together nicely.  You then score the dough but leave it together and bake it for 20 minutes. 


Pull the scones apart and separate on the baking sheet to continue baking.  


When they are almost finished, brush the dough with melted butter and broil the scones several minutes until brown (watching closely so they don't burn).

  
And there you have it.  A great breakfast or bread to go with a dinner salad or bowl of soup.  Now, I am going to head off to the kitchen to grab one before returning to my "super-stressed-out-planning-'til-the-wee-hours-of-the-morning" life.  Don't you want to join me?!

Spinach Feta Scones-makes 8 scones

3/4 cup buttermilk
1 egg
3 cups all-purpose flour
4 tsp baking powder
6 tbsp butter, chilled and cut in cubes
2 tbsp butter, melted
1/8 cup sugar
1 tsp salt
10 oz frozen chopped spinach, thawed and squeezed of excess moisture
4 oz crumbled feta

Preheat oven to 375 degrees.

In a small bowl, whisk the egg and buttermilk until blended.  In a medium bowl, combine flour, baking powder, sugar, and salt.  Using a pastry blender or your fingers, cut the butter into the dry ingredients until it resembles coarse crumbs.  Add buttermilk mixture to dry ingredients and stir gently to combine.  Add spinach and feta and stir to blend.  Put dough on a lightly floured surface
and knead until the ingredients are mixed thoroughly and uniformly (5-6 times should be sufficient).  Pat dough into a 3/4 inch thick circle.  Score the dough into eight wedges but do not pull apart.  Place circle on parchment lined baking sheet and bake 20 minutes.  Remove pan from oven and separate wedges.  Continue baking 10 minutes more until the edges of each wedge are dry.  Remove from oven, turn on the broiler, brush each scone with melted butter, and place back in the oven.  Broil the scones 2 minutes or so more until browned on top (be careful not to burn).  Scones can be eaten warm or placed in an airtight container and enjoyed for several days. 


Sunday, August 21, 2011

Roasted Salsa Verde

I recently came across a basket of ripe tomatillos at the market.  I was intrigued.  The only place I had ever seen tomatillos was in the produce section of the grocery store and, or course, those were not local.  These, on the other hand, were grown nearby and were beautiful.  They were calling my name (well, maybe not literally, but I am sure that the produce fairy on my shoulder told me to buy them), and I knew exactly what should be done with them- salsa verde.  I was thinking of all the meals that I make using salsa verde including Chicken and Summer Vegetable Tostadas (recipe to be posted soon), and I was so excited at the idea of being able to make it myself.  I purchased every tomatillo in the basket which, sadly, only amounted to 3 pounds.  I was not deterred. So what if I would only have a few jars of salsa.  At least I could say I had made them. 


I got home with my little green treasures and started rummaging around my cookbook shelf for salsa verde recipes.  I noticed that in many of the recipes, the vegetables were roasted before being pureed, and I thought that would add an interesting flavor element to the finished salsa.  I combined the ingredients and methods from several cookbooks being careful not to change the overall acidity in the recipe, and what I came up with yielded about 3 pints of salsa verde.  

This version of salsa verde is spicy but not overly so.  If you want to increase the spiciness, use a hotter chile or leave the seeds in rather than increasing the amount of chiles as this may make the salsa unsafe for canning.  You can, however, decrease the amount of chile used for a milder version.  I suggest starting with a couple of the chiles and adding more to suit your tastes.  

The salsa begins with tomatillos, garlic, chiles, and onion which you place on a sheet pan and roast in the oven.  I must tell you that I was a little unorganized when making it and forgot to add the onion in this picture.  I did roast the onion along with the other veggies though.  


In addition, I got caught up in the moment (as so often happens to me) and forgot to take a picture of the finished roasted veggies.  Just visualize blackened, soft veggies that no longer hold their shape and are oozing juices all over the pan.  Got the image in your head?  Okay, good.  So you put them in a food processor or blender and puree them until they are relatively smooth.  You won't get a completely smooth puree because of all the blackened bits and seeds, but you don't want big chunks either. 

Pour the mixture back into your pot.  Now, it should look something like this. Notice the black bits which really add extra flavor to the salsa.  This is one main reason to make your own if you can get your hands on tomatillos.  The store-bought stuff just can't give you the smokey taste that roasting the veggies at home can provide. 


Taste your salsa and make sure it is seasoned to your liking and is spicy enough.  Remember, if you didn't add all the chiles from the start, you can puree the rest and add them now for more kick if needed. 

The salsa then gets ladled into hot jars and processed.  This recipe only makes 3 pints, but if you want to make more, you can easily double it.  I would have but I couldn't get enough tomatillos.  Darn that farmer for not growing more! 


Roasted Salsa Verde (adapted from Canning for a New Generation and So Easy to Preserve)
makes approximately 3 pint jars

3 pounds tomatillos, husks and stems removed
1 onion, chopped (I used a Vidalia but any white or yellow onion will do)
2 jalapeno peppers, seeds removed
2 serrano chiles, seeds removed
4 garlic cloves, peeled
1 cup packed chopped cilantro
2/3 cup fresh lime juice
2 1/2 tsp kosher salt

Preheat oven to 500 degrees.  Place tomatillos, onion, chiles, and garlic on a sheet pan.  Roast for 15-20 minutes until vegetables are blackened, limp, and oozing.  Place vegetables, pan juices, and cilantro in a food processor or blender and puree until smooth.  Pour back into the pot and add lime juice and salt.  Adjust seasoning with more lime juice or salt to taste. 

Ladle salsa into hot, sterilized pint jars leaving 1/2 inch headspace.  Remove air bubbles, adjust headpace, and wipe rims.  Top with sterlized lids and rings.  Process in a water bath canner for 15 minutes.  Leave jars in canner for 5 minutes after processing time is complete.  Remove to a towel and allow to stand for 24 hours.  Check seals, lable, and store.


Wednesday, August 17, 2011

Tomatoes Part 2: Soup, Jam, and Bruschetta

Several days ago I told you about some sauces that I like to make with fresh tomatoes.  Now let me tell you about some other miscellaneous uses for tomatoes that we enjoy each season.  Some of the recipes and ideas are from fellow bloggers, and I will give you a link to their sites. 


Tomato Use #1-  Heirloom Tomato Bruschetta on Fried Garlic Toast:
(recipe follows at end of post)

So in the last post, I told you that we don't eat that many raw tomatoes.  My husband does not like them very much, and since it is only the two of us, it rarely makes sense for me to fix something that both of us will not eat.  That is, with the exception of bruschetta.  To tell you about the bruschetta I must fill you in on a little (ever-so-slightly-embarrassing) secret.  When the movie Julie and Julia came out I must have watched it a dozen times.  Not so much for the story itself (although the story is good), but for the images of the bruschetta that Julie makes one night for dinner.  I became obsessed with it and decided I could not rest until I had recreated it for myself.

Unlike traditional bruschettas, the bread is not grilled or toasted.  Instead, it is fried.  Now, I realize frying bread to top with fresh tomatoes may seem a little conterproductive in the nutrition department.  One is so healthy, the other not so much.  But hear me out.  When you lightly fry the bread and rub it with fresh garlic, it becomes crisp, crunchy, garlicky, and irresistable.  The topping of chopped tomatoes, basil, and olive oil soaks into the bread which remains crisp despite the juices (remember it is fried).  When you bite into it, you get all these tastes at once, and it is delicious.  It is a common lunch for me throughout the summer, and it lives up to my Julie and Julia expectations. 


Tomato Use #2-  Tomato Jam:
I first came across the idea for tomato jam from the Food in Jars blog.  I had never considered tomatoes in a savory and sweet concoction like this before, but once I tried it, I was hooked.  It tastes a little like ketchup but without the vinegary bite that traditional ketchup has.  It is super easy to make since it requires no peeling of the tomatoes, and it makes a fairly good sized batch for the amount of time you contribute.  It is great on cornbread, biscuits, toast, and other types of bread.  It is fantastic with cheese, and I am really looking forward to trying it as the base to a variety of sauces.  I think it would be great mixed with a little vinegar to top meatloaf or as a base to barbecue sauce.  I will be sure to share other uses for this jam as I experiment over the fall and winter months.  Oh, and I just discovered that it is pretty darn tasty as a snack with homemade croutons that I made over the weekend.   


Tomato Use #3-  Classic Tomato Soup:
This recipe also comes from a fellow blogger over at Thy Hand Hath Provided.
It is a rich, smooth tomato soup recipe for those of us who have enjoyed Campbell's at some point in our lives but want something fresher and a little more grown up.  I don't have any pictures of this soup in the pot, but check out the link for pictures and the recipe.  I will say that I have not tried canning this soup yet.  I plan on trying my hand at pressure canning it as soon as I find time to experiment with my new pressure canner.  I do freeze it, and it freezes beautifully.  Here is a terrible picture of a few quarts of frozen soup I made earlier in the month.  I am planning to make more of this soup tomorrow.  Sorry for the poor quality photo, but I am including it to show that I freeze it in zippered freezer bags and it works fine. 


Heirloom Tomato Bruschetta on Fried Garlic Toast: 
This is really not a recipe as much as it is a method.  You can increase the ingredients to serve as many as needed or to fit your personal tastes.  

3 medium heirloom tomatoes (can also use regular tomatoes)
1-2 tbsp extra virgin olive oil, plus more for frying
approximately six fresh basil leaves, sliced into ribbons (plus more for garnish)
sea salt, to taste
fresh cracked black pepper, to taste
1 clove of garlic, peeled and cut in half
2 large slices of crusty bread, cut in half to form 4 pieces

Coarsely chop the tomatoes.  Mix the tomatoes with sliced basil, 1-2 tbsp olive oil, salt and pepper.  Adjust seasonings to taste and set aside.  Heat just enough olive oil to lightly coat the bottom of a skillet on medium high heat.  Once hot, place bread in oil and fry until lightly browned on bottom.  Flip and repeat on the other side. Remove bread from skillet and rub one side of each slice with the garlic clove.  Top each bread slice with the tomato mixture (make sure to get a little of the liquid).  Sprinkle a little more basil over each slice and enjoy. 


Monday, August 15, 2011

Tomatoes Part 1: Sauces

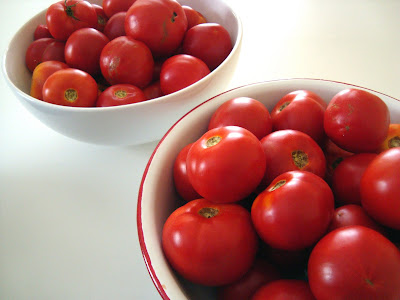
If you are anything like me you have seen a lot of tomatoes lately.  Whether they are coming from your backyard or a local farmer's market, they seem to be everywhere.  I like tomatoes in most any form, but I particularly like them cooked.  My hubby, on the other hand, will only eat them cooked and well seasoned with other ingredients which means lots of tomato sauces for us.  We eat Italian style sauces on pasta, pizza, and chicken, and we eat salsa almost every week on what has become our usual "taco night".  So, I decided to share some of the ways we preserve and use tomatoes in a two part post (the next part will follow in a day or so).  Today's focus, as you can tell by the title, is sauces. 


All of these sauces require that you either peel the tomatoes before making the sauce or pass them through a food mill to remove the seeds and skin.  Although I own just about every kitchen gadget known to man, a food mill is one thing I am missing. So I peel the tomatoes by hand.  It does not take that long to peel them, and I actually find it somewhat relaxing (call me crazy).  Something about the repetition and thoughtlessness of the task is nice.  If you don't feel the same way, just try to grin and bare it.  It only take a few minutes.  

I am sure many of you know how to peel tomatoes, but if you don't, here is a quick "down-and-dirty" set of instructions.


Cut an "x" in the bottom of each tomato.

Blanch the tomatoes in boiling water for about 1 minute until the peel starts to pull away.

Place tomatoes in an ice bath to cool for about 1 minute.


Peel the tomatoes by pulling the skin away starting at the bottom.  Use a knife to remove the cores from the tomatoes.  You can also core them before if you prefer.


Now that our tomatoes are peeled, on to the sauces.  These sauces can be processed in a boiling water bath but remember to follow the recipes and add the amount of lemon juice or vinegar called for to keep them safe.  Alternately, each sauce can be frozen. 

Sauce #1- Seasoned Tomato Sauce: 
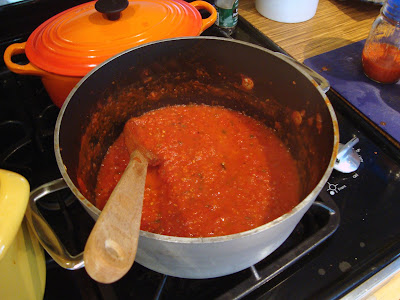
This sauce is basically from the Ball Complete Book of Home Preserving although I did change the method a little.  This sauce is a good basic sauce to use on pasta or pizza.  It cooks for approximately 2 hours which makes for a thicker consistency.  My hubby is a bit of a picky eater although I must give him credit and say that he has come a long way since we have been married.  One thing he does not budge on though is his desire for a smooth sauce which is one reason why we like this one so much.  It is pureed to create a smooth texture which is very versatile.  


Sauce #2- Garden Tomato Sauce:
This sauce is an adaptation of the Italian-Style Tomato Sauce in the Ball Complete Book.  I am a bit of a rebel and add some fresh and dried herbs for more flavor.  If you want to stick with the tried and true recipe to be absolutely sure, just omit the herbs and add them when you get ready to eat the sauce.  This is a great sauce for pasta as well, and if you have kids (or picky spouses), it is a great way to get more vegetables into the sauce without them knowing.  The sauce uses plum tomatoes which makes it somewhat thick.  In the original recipe, the vegetables are left chunky, but I puree the sauce to suit our tastes.  


Make sure to use plum tomatoes or drain your tomatoes very well to prevent a watery sauce.

This is what it looks like before being pureed.  It can be left this way for a chunky sauce.

Or puree it in a food processor for a smoother consistency
  

Pureed sauce in jars-  It made just over 3 pints. 

Sauce #3-  Salsa:
Okay, before I even start telling you about this salsa, I give you permission to call me a cheater.  I did cheat, and I will tell you right now that I would do it again in a heartbeat.  I used a packet of Fiesta Salsa Mix from Ball to make my salsa this year.  It was easy.  All I had to do was prep the tomatoes, and it came out tasting just as good (maybe even better) than other canned salsa recipes I have tried.  I will tell you that sometimes I take issue with canned salsa recipes because of the amount of vinegar you have to add.  With this mix, the salsa was not as tart, and I really tasted the tomatoes and seasonings.  I like it and will make it again next year even if it is cheating.  Mrs. Wages also makes a comparable salsa mix which turns out tasty (I have tried it also).  I do process the prepared salsa in the food processor to make a coarse puree. 
  

Seasoned Tomato Sauce (adapted from Ball Complete Book):
makes approximately 6 pints (mine made 7)

10 pounds tomatoes, cored, peeled, and crushed with a spoon
2 1/2 cups diced onion
3 cloves garlic, minced
1 tsp dried oregano
1 tsp dried basil
2 bay leaves
1 tsp salt
1 tsp black pepper
2 tsp granulated sugar
1/2 tsp dried pepper flakes
Bottled lemon juice (must be bottled, not fresh)

Stir all ingredients together (except lemon juice) and bring to a boil.  Reduce heat and simmer, stirring frequently, for about 2 hours (may take less time depending on type of tomato used) until the sauce has thickened slightly and is reduced by about half.  Turn the heat off, and transfer the mixture in batches to a food processor.  Process until the mixture is fairly smooth.  Return puree to the pot and bring back to a boil. 

Place 1 tbsp of lemon juice in each hot sterilized pint jar.  Fill jars with sauce leaving 1/2 inch headspace.  Remove air bubbles, adjust headspace, wipe rims, and top with sterlized lids and rings.  Process in a boiling water bath for 35 minutes.  Leave in canner 5 minutes.  Remove to a towel to cool completely.  After 24 hours, check seals and store.

Garden Tomato Sauce (adapted from Ball Complete Book):
makes approximately 3 pints

8 cups plum tomatoes, cored, peeled, and chopped
2/3 cup finely chopped onion
2/3 cup finely chopped celery
1/2 finely chopped or grated carrot (I grate mine)
2 cloves garlic, finely chopped
4 tbsp lemon juice (bottled, not fresh)
2 tsp salt
1/2 tsp black pepper
1/2 tsp hot pepper flakes
2 tbsp finely chopped fresh basil (or 1 1/2 tsp dried), optional
1 tsp dried oregano, optional

Place tomatoes, onion, celery, carrot, and garlic in a large nonreactive pot and and bring to a boil.  Stir in lemon juice, salt, black pepper, hot pepper flakes, and herbs (if using).  Boil sauce until reduced by about 1/3, approximately 15 minutes.  At this point you can leave it chunky or puree it (like I do) in a food processor.  If pureeing, return it to the pot to come to a boil again.  

Ladle sauce into hot sterilized jars leaving 1/2 inch headspace.  Remove air bubbles, adjust headspace, wipe rims, and top with sterlized lids and rings.  Process jars in a boiling water bath for 35 minutes.  Allow jars to sit in canner 5 minutes after processing time is complete.  Remove jars to a towel to rest for 24 hours.  Check seals and store.     


Thursday, August 11, 2011

Black and Blue Jam (with Buttermilk Biscuits)

Before I begin telling you about the jam I made, let me fill you in on some exciting news.  As you know from reading the blog I use a boiling water bath canner on a frequent basis and have been doing so for several years.  This summer in particular I have become a little more (okay, a lot more) obsessed with "putting food up".  This is not so that I will be prepared in case of a natural or man-made disaster, it is because I enjoy eating things I prepare and knowing where our food is coming from is important to me.  Not to mention, it is pretty darn fun!  Anyway, tomorrow I am going to be delving even more deeply into this subject as I take a class on pressure canning.  I am so excited!  My wonderful hubby purchased the class for me for my birthday a couple of months ago (some of you may think that is a bad gift but I think it is fabulous), and now it is here.  In preparation, I got on Amazon last night and ordered a pressure canner because I know that as soon as that class ends tomorrow, I am going to be anxious to get my hands dirty.  So stay tuned as I learn to pressure can in the near future and share my experiences with you. 


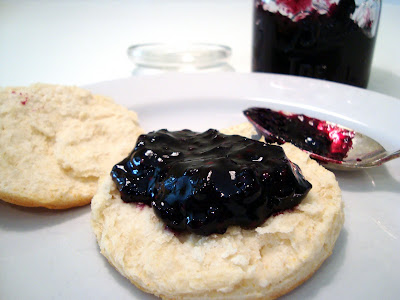
Now, for today's jam.  This summer I have been playing around with blueberry jam.  I made a great recipe for blueberry lemon honey jam found in the Tart and Sweet cookbook.  It was very good, but I wanted something a little different.  I decided to try a spiced jam with blueberries and blackberries since that is what I had on hand in the refrigerator.  The jam turned out beautifully.  It is just the right amount of sweet berry goodness with slight undertones of cinnamon and ginger.  It is also a classic jam in that it contains no added pectin.  Instead the jam is cooked down until it reduces and thickens to a jam consistency.  It does take a little longer, but produces a much deeper flavored jam that I really love.  Oh, and I don't want to forget to tell you that I made crusty buttermilk biscuits to go along with the jam (which ended up being my lunch).  Yum!

Leftover jam in an old Ball jar


The jam begins with blueberries, blackberries, sugar, and honey which you bring to a boil.  This mixture will simmer anywhere from 20-40 minutes depending on the amount of liquid in your fruit and the humidity outside.  If you live in the hot, humid south like me it will probably take longer than 20 minutes to get the consistency you want.  When making a classic jam like this, there are several ways to test for gel.  The easiest is to place a plate in the freezer at the beginning of your jam making session.  After cooking the jam 20 minutes, put a little dollop on the plate and put it back in the freezer.  If, after a couple of minutes, you can push the jam with your finger and it wrinkles up a little and holds its shape, it is ready (this is around 220 degrees).  

Jam in my copper jam pot ready to go into jars

Once it is ready, ladle it into jars to be processed.  You could use 8 oz jars, but I used 4 oz jelly jars because I love how cute they are.  I only had 7 jars so I put the rest in an old mason jar to store in the refrigerator.  If I had put it all in jelly jars it would have made 10 jars of jam (which is about 5 cups total).  


I spooned a little of the jam I did not process onto a hot buttermilk biscuit for lunch and promptly devoured it, and I plan to do the same thing tomorrow morning for breakfast with the leftovers.  I also think this jam would be great heated up and spooned over pancakes in place of syrup or in mini tart shells as tiny berry pies (how cute would that be?).  


Now for the recipes. 

Black and Blue Jam with Cinnamon and Ginger
makes approximately ten 4 oz jars or five 8 oz jars

5 cups blueberries
4 cups blackberries
2 1/2 cups granulated sugar
1/2 cup honey
3/4 tsp cinnamon
1/2 tsp ground ginger

Place berries, sugar, honey, and spices in a preserving pan or nonreactive pot and bring to a boil over medium heat.  Simmer the mixture, stirring freqently to prevent scorching, for approximately 20 minutes.  At this point, begin testing for gel by placing a dollop of jam on a chilled plate and putting it in the freezer.  If the mixture holds its shape and wrinkles up when pushed with a finger, it is ready.  If not, continue cooking until it reaches that state which may take up to 40 minutes.  Be very careful not to allow the jam to stick to the bottom of the pan as it thickens. 

Once a proper consistency has been reached, ladle the jam into jars leaving 1/4 inch headspace.  Wipe the rims and top with sterilized lids and rings.  Process jars in boiling water bath for 10 minutes.  Allow jars to sit five minutes after processing time and then remove them to a towel to rest for 24 hours. 

Crusty Buttermilk Biscuits- makes 15 3-inch biscuits

I have to begin by saying that this recipe comes from a book titled The Gift of Southern Cooking by Edna Lewis and Scott Peacock. It is a wonderful book with great southern recipes.  These biscuits are crusty on the outside and tender on the inside, but they do not rise as much as some biscuit recipes.  They are not low fat so if you are scared of lard, stay away from these.  My motto is "everything in moderation". This recipe and many other southern baking recipes call for a brand of flour called White Lily.  It is a flour which is lower in gluten and protein and produces a more tender product.  If you can't find White Lily, try Martha White, or use regular flour.


5 cups sifted all-purpose flour (preferably White Lily brand) 
1 tbsp plus 1/2 tsp baking powder
1 tbsp kosher salt
1/2 cup chilled lard
1 1/4 buttermilk
3 tbsp unsalted butter, melted

Preheat oven to 500 degrees.  Put dry ingredients in a large bowl and whisk to combine.  Add the lard and rub it with your fingers to incorporate it into the flour until it resembles coarse crumbs.  Add buttermilk and mix just until blended.  Place dough on a floured surface and roll to 1/2 inch thickness.  Prick dough every 1/2 inch with a fork. Cut it in circles using a 2 to 3 inch biscuit cutter (do not twist the cutter when you press down).  Place biscuits on a parchment lined baking sheet so that they are just touching.  Bake 10-12 minutes until browned on top.  Remove from oven and brush with melted butter.  Serve hot.    


Tuesday, August 9, 2011

Chicken Curry with Green Beans

So I have to begin by saying that I have seen a lot of green beans in the past few weeks.  They are in season right now, and there are huge baskets of them at the farmer's market just calling my name.  I had already put up five quarts  of frozen green beans but just couldn't resist getting a little more today when I visited the market.  I love having them tucked away in the freezer not to mention the fact that I am completely obsessed with purchasing produce.  I love to shop for produce like other people love to shop for ipads or clothing (at least produce is cheaper).  So upon seeing these beans today, I decided to freeze a few more bags but kept some out for dinner to add to this curry saute.  


This is one of my favorite go-to dinners when I am a little short on time but want something flavorful and relatively healthy.  You can use a variety of veggies in this dish, anything from small green peas to butternut squash.  Just choose whatever is in season that you like.  Today, of course, I went with the green bean.  

The original recipe came from a book titled Sara Foster's Casual Cooking, but I have changed it a lot to fit my needs and tastes.  The original recipe called for twice the amount of meat that I use.  I prefer to use equal parts meat and vegetable instead.  It begins with 2 large boneless skinless chicken breasts which have been thinly sliced.  I try to buy locally raised chicken when possible, but these were organic from the grocery.  The chicken gets lightly browned in a little olive oil.  In the meantime, the trimmed green beans get blanched and tossed into an ice bath (this can be done ahead of time).  Once the chicken is browned, a sauce is made in the same pan and everything gets mixed together along with some mango chutney.  On a side note, I have a recipe for preserved mango chutney I am dying to try, but tonight I had to use the store-bought stuff.  Maybe next time.  


What you end up with is a saute of chicken and green beans (or veg of choice) in a slightly spicy, slightly sweet sauce.  All it needs is a little spinkling of sliced almonds and cilantro and a side of rice or couscous to soak up the sauce.  I recently cleaned out my cabinets and found an unopened bag of a couscous and grain blend from Trader Joe's which is what we ate it with tonight.  Fast, full of vegetables, and tasty.  What more could you ask for?  Well...


Curried Chicken Saute with Green Beans- serves 4

2 boneless skinless chicken breasts, thinly sliced
2 tbsp olive oil
1/2 onion, minced
2 garlic cloves, minced
1 tbsp curry powder
1/2 tbsp grated ginger
Juice and zest of 1 lime
1 cup unsweetened coconut milk (I use lite)
3/4 cup chicken broth
2 tbsp mango chutney
2 cups green beans, cut in 1 inch pieces and blanched
Cilantro, chopped
Toasted sliced almonds (cashews or sesame seeds also work)
Kosher salt and black pepper

Heat oil in skillet on medium high and add chicken.  Cook chicken 2 minutes on each side.  Remove to a plate and set aside.  Reduce heat to medium.  Add onion and cook several minutes until tender.  Add garlic and ginger and cook 1 minute.  Add curry and lime zest and juice and stir to combine.  Reduce heat to low.  Add chicken and green beans and simmer several minutes until the green beans are tender but still crunchy.  Stir in the mango chutney and cook 1 minute.  Serve sprinkled with cilantro and almonds.