But no more...
I have just rendered my own lard from leaf lard purchased at the farmer's market, and the results were superb. A clean-tasting product that I know is high quality based on the farmer's practices, and a product that was so easy to produce there is absolutely no reason not to do it more often in order to have fat for pie crusts and cooking.
 |
| Pure white lard ready for a pie crust |
Now, before you poo-poo lard (because it has been poo-pooed over the years), make sure you read these articles.
http://www.drweil.com/drw/u/TIP04540/Lard-Making-a-Comeback.html
http://www.foodandwine.com/articles/lard-the-new-health-food
http://www.healthygreenkitchen.com/how-and-why-to-render-your-own-lard.html
It turns out that lard actually has less saturated fat than butter, and the monounsaturated fat (the stuff we love about olive oil) found in lard is about double that of butter . It is really not a bad fat for you, used in moderation of course, and it is one that we should not be afraid to use if we know its origins and how the pigs were raised.
What you will need to begin rendering your own lard is high-quality leaf lard. Leaf lard is the fat from around the kidney and belly area of the pig. You can also use fatback but you will have to trim the rind which to me means more work and less yield for my money. Once you buy your leaf lard, you will want to trim away any traces of meat so that it is white and beautiful. Then you can cut it in chunks and pop it in your slow cooker. These chunks will begin to slowly melt, and as they do, you can spoon the melted fat through cheesecloth into a clean jar and set it aside to cool to room temperature at which point it will solidify and turn white.
 |
| Lard begin filtered through cheesecloth |
 |
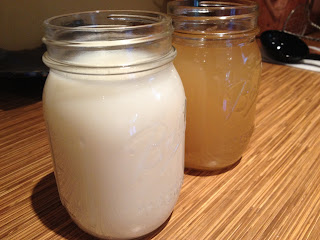
| The first and second jars of lard- the first jar on left had solidified, and the second was still in liquid state which explains the significant color difference. |
 |
| Lard ordered from the first spooned off (on left) to the last (on right). The color of the lard changes the longer it is cooked. |
 |
| Pork crackins' ready to drain on paper towels |
So, lard...all in all, easy, economical, and tasty. Definitely something I will be making again.
Homemade Lard- makes approximately 2 1/2 pints
The quantity of rendered lard will depend on different factors dealing with the fat you are using. A good rule of thumb is that every 3 pounds of leaf lard will yield approximately 4 cups finished lard.
3 pounds leaf lard, trimmed and cut into 1 inch chunks
Tools Needed:
slow cooker
funnel
cheesecloth
sterilized jars
ladle
Place the chunks of leaf lard into the slow cooker, cover, and heat on the low setting. Once the fat begins to melt and accumulate around the chunks, remove the lid (you don't want the fat to overheat). When you see enough melted fat to begin spooning some off, remove it and strain it through a cheesecloth lined funnel into a clean jar. Continue to do this every hour or so to strain the fat as it melts. This will help you get the purest tasting lard possible. Continue to cook the fat on low for 6-8 hours, removing melted fat as it accumulates. When no more melted fat is coming out of the chunks, it is finished. The resulting pork chunks are cracklins' and can be used in cornbread, greens, on salads, or just eaten with a little salt for seasoning. Allow the lard to come to room temperature in the jars at which point it will solidify. Store the lard in the refrigerator if you plan on using it within a month or so, or freeze it for longer storage. The cracklins' can also be frozen.
Printable Version

No comments:
Post a Comment