x

Sunday, April 28, 2013

Rendering Lard in a Slow Cooker

If you want to make an excellent pie crust, there are two ways from the way I see it.  One made with butter and one made with high-quality lard.  Both result in exceptional flakiness.  The problem is getting your hands on good quality lard.  Hence the reason I most always turn to an all-butter crust.  

But no more...

I have just rendered my own lard from leaf lard purchased at the farmer's market, and the results were superb.  A clean-tasting product that I know is high quality based on the farmer's practices, and a product that was so easy to produce there is absolutely no reason not to do it more often in order to have fat for pie crusts and cooking.  

Pure white lard ready for a pie crust


Now, before you poo-poo lard (because it has been poo-pooed over the years), make sure you read these articles.

http://www.drweil.com/drw/u/TIP04540/Lard-Making-a-Comeback.html
http://www.foodandwine.com/articles/lard-the-new-health-food
http://www.healthygreenkitchen.com/how-and-why-to-render-your-own-lard.html

It turns out that lard actually has less saturated fat than butter, and the monounsaturated fat (the stuff we love about olive oil) found in lard is about double that of butter .  It is really not a bad fat for you, used in moderation of course, and it is one that we should not be afraid to use if we know its origins and how the pigs were raised. 

What you will need to begin rendering your own lard is high-quality leaf lard.  Leaf lard is the fat from around the kidney and belly area of the pig.  You can also use fatback but you will have to trim the rind which to me means more work and less yield for my money.  Once you buy your leaf lard, you will want to trim away any traces of meat so that it is white and beautiful. Then you can cut it in chunks and pop it in your slow cooker.  These chunks will begin to slowly melt, and as they do, you can spoon the melted fat through cheesecloth into a clean jar and set it aside to cool to room temperature at which point it will solidify and turn white. 

Lard begin filtered through cheesecloth

The first and second jars of lard- the first jar on left had solidified, and the second was still in liquid state which explains the significant color difference.
You will want to spoon this fat every hour or so (maybe even more often) because the first fat you spoon off will be your whitest and purest tasting lard, the stuff you will want to use in pie crusts.  As the chunks continue to cook over the course of 6-8 hours, the resulting melted fat will become slightly darker in color and porkier in flavor.  This is the stuff you will want to saute/fry with or use in cornbread or savory dishes where a hint of pork flavor will be appreciated.    

Lard ordered from the first spooned off (on left) to the last (on right).  The color of the lard changes the longer it is cooked.
So, here is what the end-result looked like.  Three pounds of leaf lard produced 2 1/2 pints of rendered fat for a little less than ten dollars. You can tell the difference in jars of fat by looking at the color of the lard.  The lighter jar is pure white and clean tasting with no real pork flavor, while the other two jars get gradually more cream colored.  The middle jar will still be fine for pie crusts, but that last small jar I will reserve for cooking.

Pork crackins' ready to drain on paper towels
One other fantastic benefit of rendering your own lard is that, in the end, you are left with little bits of crunchy pork goodness called cracklins' which you can add to a variety of dishes including salads (where you would add bacon), cornbread (a recipe will follow soon), or just munch on as is.  

So, lard...all in all, easy, economical, and tasty.  Definitely something I will be making again.    

Homemade Lard-  makes approximately 2 1/2 pints

The quantity of rendered lard will depend on different factors dealing with the fat you are using.  A good rule of thumb is that every 3 pounds of leaf lard will yield approximately 4 cups finished lard. 

3 pounds leaf lard, trimmed and cut into 1 inch chunks

Tools Needed: 
slow cooker
funnel
cheesecloth
sterilized jars
ladle

Place the chunks of leaf lard into the slow cooker, cover, and heat on the low setting.  Once the fat begins to melt and accumulate around the chunks, remove the lid (you don't want the fat to overheat).  When you see enough melted fat to begin spooning some off, remove it and strain it through a cheesecloth lined funnel into a clean jar.  Continue to do this every hour or so to strain the fat as it melts.  This will help you get the purest tasting lard possible.  Continue to cook the fat on low for 6-8 hours, removing melted fat as it accumulates.  When no more melted fat is coming out of the chunks, it is finished.  The resulting pork chunks are cracklins' and can be used in cornbread, greens, on salads, or just eaten with a little salt for seasoning.  Allow the lard to come to room temperature in the jars at which point it will solidify.  Store the lard in the refrigerator if you plan on using it within a month or so, or freeze it for longer storage. The cracklins' can also be frozen.   

Printable Version


Saturday, April 20, 2013

Making and Canning Chicken Stock

I use a lot of chicken stock, and several years ago I began making my own and freezing it.  The problem with that was that I often forgot to thaw it out, so I ended up having to make do without it once I got home and was ready to cook.  Then the pressure canner entered my life and saved me from this dilemma.  Now, I make and pressure can the stock and it is ready at a moment's notice.  


Homemade stock is far superior to that which is purchased in the grocery store.  It has a deeper flavor making it great for sauces and soups where you really want the taste of the stock to stand out.  It is also superior because you can control the quantity of salt and the ingredients used.  In addition, it is super economical.  When I roast a chicken or have extra bones or veggies on hand, I just freeze them and save them for stock which means that the only real cost to me are the lids needed for the jars.  The other fantastic thing about it is that, even though it is a time consuming process, it leaves me with at least 9 pints of stock to store.  That would cost me 20 dollars or more in the grocery if I purchased quality stock.  


Everyone has their own preferred methods when making stock, and you can use your own "recipe" and then can it accordingly if you prefer.  The canning directions and time for pressure canning chicken stock will remain the same no matter which recipe or method you use.  I make mine using about 3 pounds of chicken bones.  Sometimes these bones are cooked (which results in a darker stock) and sometimes they are raw.  For this batch, I used 3 carcasses from leftover roasted chickens along with the bones from a pound of chicken thighs I had boned for another recipe.  The bones went into a big stock pot with some veggies and aromatics (I don't tie my aromatics up since I am straining the stock later) and were covered with water.  After about 5 hours of simmering on the stove, I removed the solids and strained the liquid through a sieve lined with cheesecloth which produced a clean stock with no solid pieces present.  I don't worry about clarifying my stock because it just doesn't matter to me, but you certainly can if you want.  


Once strained, placed in jars, and pressure canned, you end up with a lovely stock to use whenever you want, no thawing or trips to the store necessary.  

Remember that chicken stock is not safe to can in a regular canner.  You must use a pressure canner.  If you are new to pressure canning, read my Pressure Canning 101 page and study your pressure canning manual before beginning.  I am not going to post all the directions for pressure canning in the recipe because they are too lengthy.  Just follow the above link if you need them.  If you prefer to freeze the stock, that can certainly be done.  Just try to be better than me at thinking ahead and thawing it out. 

Chicken Stock in the Pressure Canner-  makes approximately 8-10 pints

I make stock in a 3 gallon stock pot.  If your pot is not as large, decrease the quantities.  For 8-10 pints of stock, I use somewhere between 1 1/2 and 2 gallons of water.  The quantity of water used will depend on how much it takes to cover your solids, and the amount used will obviously affect the quantity of finished stock you will end up making.    

3-4 pounds chicken bones, from cooked or raw chicken
1-2 tsp salt, depending on how salty you want your broth
3 carrots, washed and cut into large pieces
2 onions, peeled and quartered
2 celery stalks, chopped (add a handful of celery leaves also if you have them)
2 sprigs of thyme
8 sprigs of parsley
1 bay leaf
3 garlic cloves, peeled and crushed with the back of a knife
2 whole cloves
1 tsp whole peppercorns
Cold water to cover (somewhere between 1 1/2 and 2 gallons)

Place all solid ingredients in a very large stock pot and cover with cold water by at least 1 inch.  Bring the mixture to a boil, reduce heat, and simmer slowly for 4-5 hours.  During this time, skim any foam or scum that forms on top.  After cooking, remove all large solid pieces and discard.  Strain the remaining liquid through a fine meshed sieve lined with cheesecloth until no solids remain in the liquid.  

If you wish to remove excess fat from your stock (which I do), you can either spoon the fat from the top or place the cooled stock into the refrigerator overnight.  The next day, remove the stock, and use a spoon to remove the solidified fat from the top.  Then reheat the stock before canning. 

For Pressure Canning-    

Sterilize 8-10 pint jars.  Heat the lids in a small pot of boiling water.  Ready your pressure canner according to the manufacturer's directions and follow this link for Pressure Canning 101 steps.  Once the water in your canner is boiling and your jars are hot, ladle the hot stock into jars, leaving 1 inch headspace.  Place lids and rings on top of each jar.  Place jars back in the canner.  Can according to the pressure canner directions at 11 pounds of pressure (check your altitude to see if this needs to be adjusted) for 20 minutes.  Once the pressure in the canner is zero, remove the jars and allow them to cool on a clean towel before labeling and storing. 

Printable Version
 

Sunday, April 14, 2013

Chickens!

For anyone who knows me, it will be nothing new that one of my long time dreams has been to live on enough land to have chickens.  Well, the land hasn't really happened, so I finally decided to settle with going through the permit process to have chickens on my 1/3 acre lot.  I had really been putting it off just because I didn't feel like jumping through all the red tape associated with that process, but it turned out to be rather painless, and here I am six weeks later with healthy, growing chicks (which is one reason my food blogging life has slowed down a little around here).  

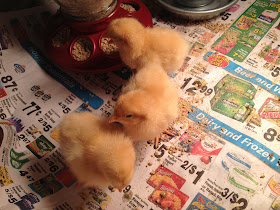
Six weeks ago tomorrow, I went to a feed and seed about 45 minutes from my house to pick up a special order of three Buff Orpington chicks.  I drove home with them chirping in the box all the way and then set them up in a washtub I had lined with newspaper (I put pine shavings in the next day after they knew where their food was and what it looked like).  This is what they looked like on day one.  


They remained snug and warm under a heat lamp for several weeks until we had to abandon the washtub for a larger homemade brooder made out of a plastic bin lined with cardboard and wire.  They liked their new home and enjoyed daily "trips" out of the brooder to roam around the floor of our guest room (it was still too cold to go outside). 


They went through what we affectionately called the "hobo" stage when they looked a little disheveled.  


Along the way, they enjoyed reading Our State magazines and textbooks on teaching.  Yes, we're raising exceptionally intelligent birds.   


They learned that the food jar was a fun place to sit (at which point we put in a roost).  And they've learned that they like mashed sweet potato, yogurt, applesauce, and scrambled eggs, but do not like cold, crisp foods like lettuce or cucumber.


Now, the weather is warming, and we took our first visit outside to the almost finished coop.  


The girls stayed out about 45 minutes today and loved it, eating every bug in sight.  


By the time I took them in, they were completely tuckered out and did not mind being returned to their makeshift brooder.  We will continue to visit the outdoors this week in little spurts until next weekend, when we hope they can stay for an overnighter.  We'll see how it goes.   

Monday, April 1, 2013

NYC Halal Cart Chicken and Rice

Let me begin this post with an apology.  I have been away from the blog for almost a month.  In my defense, I have been very busy traveling and taking care of some things around the house (3 chicks to be exact) which I will blog about in a post very soon.  In the meantime, that has meant that a lot of the food being produced in this little house of mine has been go-to things that I have either already posted about or aren't really worth posting in the first place.  Now that spring break has started and I am home (hallelujah), I thought it was time to get back at it.  


So, here is a very good dish for anyone who has ever eaten chicken and rice from a Halal food cart like the ones you find in New York City.  You know, the carts you see on practically every corner in the city with smokey goodness wafting in all directions as you pass.  My husband and I especially love the Halal Guys at 53rd and 6th because they don't put too many other things in with the meat and the sauces are spot on.  The white sauce is a creamy blend of who-knows-what that tastes dynamite, and the red sauce gives everything a good kick.  

After a trip a while back, we wanted to try to recreate this dish at home.  After researching and looking at different recipes online, the closest one we found was over at Serious Eats.  After tweaking it to make it even easier to make at home, I have a dish pretty darn close to the NYC favorite.  Of course, I would still prefer to this chicken and rice straight from the cart standing on the corner in New York City, but (sadly) I usually don't have that option. 

NYC Halal Cart Chicken and Rice- serves 3-4

I am unable to find harissa-style hot sauce in my area, so I use sriracha instead.  It does taste slightly different, but in the scheme of things it is in no way a deal breaker.  Use harissa if available, if you prefer.  Also, this dish is in no way prepared according to Halal standards.  I am simply calling it that to make it recognizable to anyone who has eaten at one of these ubiquitous carts.    

For the Chicken: 
2 Tbsp lemon juice
1 tsp dried oregano
1/2 tsp ground coriander
1 1/2 Tbsp minced garlic
1/4 cup olive oil
1/2 tsp kosher salt
1/4 tsp black pepper
1 1/2 pounds boneless, skinless chicken thighs (6 thighs)

For the Rice: 
2 tablespoons unsalted butter
1/2 teaspoon turmeric
1/4 teaspoon ground cumin
1 1/2 cups Basmati rice, rinsed to remove excess starch
2 1/2 cups chicken broth
1/2 tsp kosher salt 
1/4 tsp black pepper 

For the White Sauce: 
1/4 cup mayonnaise
1/4 cup Greek yogurt (regular, plain yogurt will do in a pinch)
1/2 tablespoon sugar
1 tablespoons white vinegar
1/2 teaspoon lemon juice
1/4 tsp kosher salt 
1/8 tsp ground black pepper

Additional Ingredients: 
1/4 head iceberg lettuce, sliced into thin strips
1/2 pita per person, warmed, and sliced into wedges
Sriracha sauce to serve (use Harissa-style hot sauce if available)
2 Tbsp chopped fresh parsley

To make the chicken:  
Mix the first seven chicken ingredients in a bowl.  Place the chicken thighs in a large zipper bag, and pour 1/2 the marinade over the thighs, reserving the remaining marinade for later.  

Heat a cast-iron skillet on medium-high heat until almost smoking.  Add three thighs to the skillet, and cook 4 minutes until browned on one side.  Turn the chicken, reduce heat to medium, and cook 6 more minutes, until cooked through.  Remove the thighs to a small bowl (you will use this bowl again later), and repeat with the remaining chicken.  Once the chicken is cool enough to handle, chop it into small pieces and place it back in the bowl.  Pour the reserved marinade over the chicken and let stand while preparing the other ingredients (you are not finished with the chicken just yet).    

To make the rice:  
While the cooked chicken marinates, place all rice ingredients in a small pot, stir, and bring to a boil.  Reduce the rice to a simmer, and cook on low until done, about 15 minutes.  Set aside. 

To make the white sauce: 
Mix all white sauce ingredients in a small bowl, and whisk to combine well.  Place in the refrigerator until ready to use.  

To finish and serve:  
To finish the chicken, heat the cast iron skillet on medium heat.  Add the chicken bits along with any marinade.  Cook, stirring the chicken in the skillet to loosen any brown bits from the pan.  Once heated, serve chicken on top of the rice with a drizzle of white sauce and hot sauce and lettuce and pita on the side.  Garnish with chopped parsley.