x

Sunday, November 27, 2011

Beet Relish

I am sure most of you, like me, have had a busy weekend.  I enjoyed the Thanksgiving festivities, but I am officially finished with turkey and dressing for a while.  I am now ready to move on to Christmas.  I spent some time today decorating my tree, and I am finally sitting down for the first time this weekend with nothing to do.  All of the Christmas decorations made me think of some beet relish I recently canned, and I thought now would be a great time to post the recipe.  Of course, beets don't really have much to do with the holidays, but they are widely available right now at the market, and they are bright red and festive looking all by themselves. 


I canned beets in several ways this year.  I love beet pickles (which I will tell you about in a later post), but I tried this relish which turned out to be very tasty and great to have on hand.  It can be eaten with any number of foods from slow-cooked beans, roasted meats, hot dogs, or simply spooned alongside other vegetables.  It has a little zip from horseradish which is tempered by sugar making it very versatile and interesting.  Anywhere horseradish easily treads, so will this relish.


 It is a simple recipe of diced cooked beets and shredded red cabbage.  I like my beets cut a little chunkier in this recipe, but you can dice them smaller if you prefer.  It really just depends on your personal preference and what you plan to do with the relish.  Either way, this is a relish that is instantly intriguing and addictive. 


Beet Relish- 
makes approximately 4 pints

This recipe calls for cooked beets.  You can either boil them for 35-40 (like I do) or you can roast them in the oven until tender.  Either way works.  Just make sure that you boil or roast them whole, skin on.  This makes it easier to peel the beets and keeps them from bleeding into your water or roasting pan.

5 cups cooked, peeled, and diced beets
5 cups shredded red cabbage
3 cups white vinegar
1 1/2 cups granulated sugar
1 tbsp prepared horseradish
1 tbsp kosher salt

In a large, nonreactive pot, combine beets, cabbage, vinegar, sugar, horseradish, and salt on medium-high heat.  Bring to a boil, reduce heat, and simmer 15-20 minutes until beets and cabbage are tender.  The cabbage will almost have the texture of sauerkraut when it is ready. 

Ladle the relish into hot, sterilized pint jars.  Ladle additional relish liquid on top to 1/2 inch headspace (you may have some liquid that you do not end up needing).  Remove air bubbles and adjust headspace.  Wipe the rim of each jar.  Top each jar with a sterlized lid and ring.  Process in a boiling water bath for 15 minutes.  Allow jars to sit in canner additional 5 minutes after processing time is complete.  Remove jars to a towel to cool for 24 hours.  Check seals, label, and store. 

Wednesday, November 23, 2011

The Thanksgiving Table: Toffee Pecan Pie

Pecan pie, done right, is a wonderful thing.  Many pecan pies tend to be too jelly-like in the center with way too much filling to nuts.  I prefer a pie that is filled with pecans and tastes like more than corn syrup.  Here is a great version of pecan pie that I tried several years ago and have been making ever since.  I cannot, in any way, claim this pie as my own.  I am simply making it here to show you how wonderful it is. 


I actually saw this on Martha Stewart's tv show.  She had a lady on the episode that enters (and wins) many pie contests.  This was her version of pecan pie.  It is filled with chopped nuts and a fairly traditional filling, but what sets it apart is the use of toffee bits.  They bake into the pie making the filling taste more like a candy-bar.  You would not necessarily know that there is toffee in the pie unless someone told you, but you would know that the pie was different (and better) than most.  In addition, it has a little almond extract which gives it a unique flavor that you can't really pin-point but you know is great. 


The only thing that I do to this pie that the original recipe does not is use an all-butter pie crust.  This is my go-to crust.  It is flaky, crisp, buttery, and delicious.  The crust recipe I use is at the bottom of another recipe post.  If you choose to use the crust that I use, just skim down to the bottom of the mini spiced apple pie post.  You will find it there. 

I hope you all have a fantastic holiday filled with family, friends, good food, and good fun.   Happy Thanksgiving!

Toffee Pecan Pie- from Martha Stewart

You can use your favorite pie crust, or go to my link above to get the all-butter crust recipe that I use. 

1 unbaked pie crust
3 eggs
2/3 cup light corn syrup
1/4 cup light brown sugar
1/4 cup melted butter
1/4 tsp salt
1 tsp vanilla extract
1/2 tsp almond extract
1 cup toffee bits
1 cup chopped pecans
22 pecan halves, set aside

Preheat oven to 375 degrees.

In a medium bowl, mix the eggs, corn syrup, and brown sugar.  Slowly whisk in the melted butter.  Add the salt, vanilla, almond extract, toffee, and chopped pecans.  Mix well to combine.  Pour into an unbaked pie crust.  Place the pecan halves in two rings on top of the filling with one pecan half in the middle.  Bake in the middle of the oven for 20 minutes.  Continue baking 20-30 minutes more, until the center jiggles only very slightly.  You may find that you need to cover the pie during the second part of the baking to keep it from browning too much.  Sometimes I need to do this, and sometimes I don't.

Thursday, November 17, 2011

The Thanksgiving Table: Cranberry Sauce with Apples and Pecans

No Thanksgiving meal is complete without some form of cranberry sauce.  This version is one I have been making for years.  It, in no way, resembles the canned version.  It is chock-full of whole cranberries, chunks of apple, and pecans.  It is tart and sweet with a hint of citrus, and it goes well with turkey, ham, or even casseroles that contain stuffing.  The best thing about it is that it takes about 20 minutes start to finish and can be made several days ahead of the big meal.


Even though I am calling this cranberry sauce, it is very chunky and can be used in a variety of ways after Thanksgiving passes.  If you have extra, try it heated slightly and spooned over vanilla ice cream.  It is also great spooned into store-bought puff pastry as a quick and easy turnover (preferably to be served with ice cream also).  In my family, we love pecans, so I add a little more nuts than the average person may want.  If you want just a few, go with 1/2 cup.  If you are good with a reasonable amount, go with 3/4 cup.  If you are like me and can eat pecans in anything and everything and never have enough, go with 1 cup.  Your choice.  Either way, it will be delicious.

One more thing, I have tried making this with cranberries I had frozen for several months, and it came out a little thinner than usual.  I don't know the science behind it all, but it seems fresh, unfrozen berries are best, so try that for best results.

Cranberry Sauce with Apples and Pecans- adapted from Ina Garten
makes enough to fill a 1 quart dish

If using a red apple in the sauce, do not peel. If using a lighter colored apple, peel for a prettier sauce.

1 bag (12 oz) fresh cranberries, picked over and bad berries removed
1 3/4 cup granulated sugar
1 tart apple (I use Arkansas Black but Granny Smith work also)
1 orange, zested and juiced
1 cup chopped pecans, toasted
1 cup water

Cook cranberries, sugar, and water in a skillet or saucepan on medium low for 5-10 minutes until the berries begin to soften and pop.  Add the apple, zests and juices and cook 15 minutes or so more until the apple is tender.  Remove from the heat.  Stir in the toasted nuts.  Pour into a bowl and allow to cool completely.  It will look thin at first, but it will thicken nicely as it cools.  Chill the sauce in the refrigerator until ready to serve.

Sunday, November 13, 2011

The Thanksgiving Table: Brown Butter Pumpkin Cake

If you are trying to find a new dessert for the holidays, look no further.  I did not intend on posting this cake until closer to Thanksgiving, but I can't resist anymore.  If you are anything like me, you probably begin thinking about the dessert even before you think about the turkey, and here is a cake for you to think about from now until Thanksgiving Day when you can finally eat and savor it bite by bite. 


This recipe was originally printed in the October/November issue of Fine Cooking magazine.  I saw it last year and wanted to make it but never got around to it.  I actually made it about a month ago with the excuse that I needed to try it before Thanksgiving to make sure it was worthy.  Isn't that a great excuse?  I thought so.  The results were definitely worth making again and will very likely make it to my holiday celebration this year. 


I will say that I do not bake many layer cakes, not because I don't like them, but because they are a bit time consuming (and large) when you only have two people in the house to eat them.  Since I don't bake many layer cakes, I am not the best cake froster or decorator, but this cake came out surprisingly nice looking which I credit to simple directions and steps.  If I can make the cake look similar to the cake in the magazine, anyone can!

This cake does require several steps, and while none of the steps are difficult, they can be a bit time-consuming.  The good thing is that many of them can be done ahead including the frosting and nut topping. 

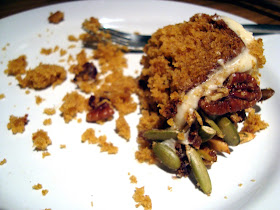
I started by toasting some pecans and pepitas in brown sugar and butter until the sugar melted and formed a candy coating.  I then added chopped dried cranberries.  The original recipe called for crystallized ginger, but when I went to the store to purchase it, they were sold out.  I am not a huge fan of it anyway, so I opted for the cranberries which still provide the chewy factor while also adding a tart element to the candied topping.  I also opted to use roasted, salted pepitas in the topping rather than raw.  Since they were salted, I left the salt (called for in the original recipe) out.


The cake layers are spiced and extra moist from the added pumpkin puree.  They cooked beautifully and came out of the pan with no problem at all.  I took part of this cake to work and we kept the rest at home.  Covered, it kept nicely for about 3 days without drying out in the least which should give you an idea of how moist these layers really are.


The frosting is made with cream cheese and brown butter.  It is creamy and nutty and could easily be eaten by the spoonful if you don't have a lot of self-control (like me).  I did read a lot of reviews about this cake before, and some people commented that they thought it needed more frosting.  I will say that there is not an overabundance of frosting.  The layer in between the two cake halves is not thick, and there is just enough to cover the outside.  I found that it was enough but there was none to spare.  If you want more, you may want to make 1 1/2 recipes of frosting to have a little wiggle room, but I don't think you need more than that because the frosting is so sweet. 


The most important thing I can say about this cake (aside from the fact that everyone who tried it loved it) is that the nuts are fantastic.  Even though the cake and frosting are delicious, the nuts make it extra special.  We made a double batch of the nuts to have enough to cover the top of the cake.  We still had a few left which made an excellent snack during the week. 


I am really making myself hungry for a slice of this right now, so I am going to end this post with the recipe.  Enjoy!

Brown Butter Pumpkin Cake- only slightly adapted from Fine Cooking
serves 8-12

Cake Layers:
3/4 cup unsalted butter, plus more for buttering the pans
2 cups all-purpose flour, plus more for the pans
1 1/2 tsp baking soda
1 1/2 tsp ground cinnamon
1 tsp ground ginger
3/4 tsp salt
1/4 tsp ground cloves
1 1/2 cups granulated sugar
2/3 cups packed brown sugar
2 large eggs
1/3 cup buttermilk
1 1/2 cups pumpkin puree (canned or fresh)

Topping (This is doubled to cover the entire top. If you just want to decorate the edge of the cake with the nuts, make only half this amount):
3 tbsp unsalted butter
1 1/3 cups pecan halves
1 cup hulled, roasted, and salted pepitas
4 tbsp packed brown sugar
3 tbsp chopped dried cranberries

Frosting:
1/2 cup unsalted butter
8 oz cream cheese, softened
1/4 cup packed brown sugar
1 1/4 cups confectioners' sugar

For the Cake:
Place an oven rack in the center of the oven and preheat the oven to 350 degrees.  Line the bottom of each pan with a round of parchment paper.  Butter the parchment and sides of the pans and flour the pans.  Melt the butter in a small saucepan on medium heat.  Swirl the butter around in the pan until it is nutty and golden, about 4 minutes.  Pour the butter into a small bowl and set aside until cool, 15 minutes.

In a medium bowl, whisk the flour, baking soda, spices, and salt.  In a large bowl, whisk the pumpkin puree, granulated sugar, brown sugar, eggs and buttermilk.  Using a spatula, gently stir the flour mixture into the pumpkin mixture until just combined.  Gently whisk in the brown butter until just combined.  Divide the batter evenly among the two pans. 

Bake the cakes about 28 minutes until a tester comes out clean.  Let stand 10 minutes.  Remove cake layers from pans and allow to cool completely on wire racks. 

For the Topping:Melt the butter in a skillet on medium heat.  Add the nuts and pepitas and cook until slightly brown, 2 minutes. Add the sugar and cook until the nuts are glazed, 2 minutes.  Add the chopped, dried cranberries.  Remove from the heat to cool completely.

For the Frosting:
Melt the butter in a saucepan on medium.  Swirl the butter until it is nutty and golden brown, about 4 minutes.  Pour into a small bowl.  Let the solids settle to the bottom of the bowl.  Carefully move the bowl to the freezer and allow it stand in the freezer 15-18 minutes.  Scrap the butter from the bowl leaving the solids at the bottom.  Discard the solids. 

Beat the butter, cream cheese, and brown sugar on medium-high speed using an electric mixer until it is light cream in color, 2 minutes.  Gradually beat in the confectioners' sugar until fluffy, 1-2 minutes more. 

Assemble the Cake:
Place one cake layer on a plate.  Spread 1/2 cup frosting over the cake layer.  Sprinkle 1/2 cup of of the nut topping on the cake layer.  Top with the second cake layer.  Frost the top and sides with the remaining frosting, and pile the remaining nut topping in the center of the cake extending out toward the edges.  (If only using half of the nut topping, arrange in a ring around the edge of the top of the cake).

Serve the cake or refrigerate 2-3 days. 

Thursday, November 10, 2011

The Thanksgiving Table: Aunt Lynn's Sweet Potato Casserole

In keeping with my last post, here is another incredibly tasty Thanksgiving side dish.  This sweet potato casserole has been on the holiday table in my family for as long as I can remember.  My Aunt Lynn always makes it, and when I got married, she gave the recipe to me.  Now, no matter where I am at Thanksgiving, I try to make this casserole.  The table is just not complete without it.  It is a pretty traditional sweet potato casserole, but isn't tradition what Thanksgiving is all about?


Like other sides at Thanksgiving, many of the parts of this dish can be made ahead.  You can roast the sweet potatoes a day or so before and chop the nuts ahead of time.  At that point, the most time consuming part of this is the topping, and that only takes a matter of minutes to whip up. 


I will warn you that this is sweet, not too sweet, but sweet enough that a good sized spoonful will do you.  It is a side dish but could almost double as dessert.  You could cut some of the sugar if you wanted to make it less caloric and sweet, but what the heck, it's Thanksgiving.  I say, go all out! 


As you have noticed by now, this is a casserole with a streusel-like topping, not marshmallows.  Marshmallows, in my personal opinion, have no place on the Thanksgiving table and especially not on top of sweet potatoes.  No offense to anyone, but a nut topping is way to go.  A crackly, crunchy crust topping creamy, dreamy sweet potatoes. What could be better?

Aunt Lynn's Sweet Potato Casserole 
serves 6-8

Filling:
5 medium or 3 large sweet potatoes, roasted until tender
1 cup sugar
2 eggs, lightly beaten
1 tsp vanilla extract
1/2 cup milk (any kind is fine- I use 2%)
1 tsp cinnamon

Topping:
1/2 cup butter, cut in small cubes
2/3 cup packed brown sugar
1/2 cup all-purpose flour
1 cup chopped pecans

Preheat oven to 350 degrees.  Scoop the flesh out of the roasted sweet potatoes.  Use a potato masher to mash the potatoes in a large bowl.  Add the remaining filling ingredients and whisk to combine until the filling is fairly smooth.  Pour the filling into a 2 quart baking dish (you can also use a 9 x 13 for a greater ratio of topping to filling). 

In a medium bowl, cut the butter into the flour and sugar until it resembles coarse crumbs.  Stir in the nuts.  Sprinkle the topping evenly over the filling.  Bake for 30-35 minutes*. 

*Sometimes to get a slightly darker topping, I place the dish under the broiler for a minute or two.  If you do this, watch it very closely because it will burn easily. 

Tuesday, November 8, 2011

The Thanksgiving Table: Shredded Brussels Sprouts with Bacon

It is hard to believe it is already November.  Thanksgiving is just around the corner, and it is time to begin thinking about the foods that will grace the Thanksgiving table.  I decided to focus the next two weeks on foods that are traditions in my family as well as a few that aren't traditions yet but are destined to be very soon.  I promise that when Thanksgiving is over I will post several canning recipes for you food preservationists (I canned several great beet recipes recently), but for now, let's all be thankful for the holiday and celebrate with one of my favorite side dishes.

Finished Brussels sprouts-  these pictures are only of half a recipe. 
Shredded Brussels sprouts with bacon is one of those dishes that is welcome on the table anytime during the fall and winter at my house.  It is easy and comes together in no time at all.  It has been known to win adamant sprout haters with its buttery taste and cabbage-like texture.  My husband and I have it often this time of year by simply halving the recipe, and it is especially convenient since most of the items can be prepped ahead of time.  When I make this at Thanksgiving, I shred the sprouts the day before and chop and refrigerate the bacon ahead of time too. 


The shredding of the sprouts in this dish is really what makes it special and gives it an interesting texture.  Some of the pieces fall apart into ribbons and become extra soft, while other pieces are just crisp-tender.  Delicious.


I began making these years ago from a recipe in a Cooking Light magazine.  The original recipe called for hazelnuts.  I have tried it with the nuts, and it was good, but I don't always have hazelnuts around the house.  Pecans would work well if you wanted to add them.  We find that there are so many dishes at Thanksgiving that contain some type of nut, it is nice to have a dish without them sometimes. Not to mention, there is enough nuttiness around the holiday table when family gathers together.  I am sure you know what I mean.

Shredded Brussels Sprouts with Bacon-  adapted from Cooking Light
serves 10-12

4 slices thick cut bacon, chopped
1/2 tbsp olive oil
1/2 cup chicken stock
2 pounds Brussels sprouts, sliced into thin ribbons
1 tsp kosher salt
1/2 tsp ground black pepper

Heat the oil in a large pot on medium high heat.  Add the bacon and cook until crisp and brown.  Remove the bacon to a towel lined plate to drain.  Add the stock to the pot.  Use a spatula to scrap up any brown bits left by the bacon.  Bring the stock to a simmer.  Add the sprouts, salt and pepper, and cook 4-6 minutes until crisp-tender.  Season to taste.  Sprinkle the bacon on top and serve.

Sunday, November 6, 2011

Pasta with Roasted Vegetables and Bacon

When I started this blog, part of the purpose of it was to keep up with great recipes that I had tried and enjoyed.  I was terrible about trying a recipe, really liking it, but forgetting about it.  So, when I tried this recipe that ran in a fairly recent Martha Stewart Living magazine, I decided I had to blog about it so that I would have a record of the recipe in an easy to find location.  While it is not a fancy-pants recipe and is certainly not difficult, it is satisfying and delicious and makes a wonderful weeknight meal-  definitely worth making over and over. 


This dish is very similar to the Orecchiette with Kale and Bacon that I posted last month, but this version is chock-full of roasted cauliflower and sweet potato.  It does contain bacon, but you could easily leave it out to make a vegetarian version. 


It begins with a few slices of bacon that are crisped up in a skillet.  Some of the drippings are reserved for tossing with the vegetables before they are roasted in the oven.  The vegetables come out perfectly tender and caramelized around the edges.  They are then tossed with the cooked pasta, a little pasta cooking liquid, and some grated parmesan cheese to make a bit of a sauce which lightly coats everything.  The recipe called for parsley, but I had some fresh sage on hand and decided to add a little for more autumn flavor.  The sage was a nice addition, adding a little more oomph to the dish.  


So, if you find yourself with some cauliflower, sweet potatoes, or even other fall veggies such as winter squash (I happen to think some roasted rutabaga would be excellent here as well), consider throwing them all together to make this tasty pasta dish.  

Pasta with Roasted Vegetables and Bacon- serves 4
adapted only slightly from Martha Stewart Living 

If you decide to make this without the bacon, simply use more olive oil for tossing the vegetables before roasting.

 2 tbsp extra-virgin olive oil
3 thick cut slices of bacon, chopped
1 medium sweet potato, peeled and cut into 1/2 inch pieces
1/2 head cauliflower, cut into small florets (about 2 1/2 cups total)
kosher salt
freshly ground black pepper
8 oz. orecchiette
3/4 cup Parmesan cheese, grated
2 large sage leaves, sliced into thin ribbons

Preheat oven to 400 degrees.  Heat oil in a skillet on medium heat.  Cook the onion until tender and beginning to caramelize.   Remove the onion to a small bowl.  Add the bacon to the same skillet and cook until it is crisp and browned.  Remove the bacon to a plate and reserve the drippings.

Toss the sweet potato and cauliflower with the reserved bacon drippings on a baking sheet.  Sprinkle with 3/4 teaspoon salt and 1/4 teaspoon black pepper. Roast 20 minutes, toss, and roast 15 minutes more until caramelized around the edges and tender.  

While the vegetables are roasting, bring a large pot of salted water to a boil.  Add the pasta and cook according to package directions.  Reserve 1 cup of the pasta cooking liquid.  Drain the pasta.  Place the pasta back in the pot.  Toss with the roasted vegetables, grated cheese, and reserved pasta water.  Stir in the sage.  Sprinkle the bacon on top and sprinkle extra cheese over everything, if desired.

Tuesday, November 1, 2011

Testing My Patience with Apple Butter

I am sure many of you out there have made apple butter.  I have made pear butter and apple butter every year for several years now.  I love the comforting, spicy flavor of a great fruit butter as well as the way it mounds up on the spoon, thick and glossy.  It does not, however, get that way quickly or easily, and every year when I make fruit butter, there is a brief moment when I tell myself that that year will be the last.  This year was no different.  As I set out to make apple butter this year (and this will probably be one of my last apple preserving posts for the season), I decided to try something a little different.  You see, every year I make my butter on the stove.  It spatters and bubbles like a volcano and generally makes a bit of a mess while also taking its ever-loving time.  This year, however, I read that a slow cooker can be a fruit butter maker's best friend.


I tried it, and I must tell you, that while the process is less hands-on and a bit easier, it is no less time consuming.  This could, in large part, be due to the fact that my slow cooker is small enough to have been created for gnomes rather than humans (I have since purchased a larger slow cooker), but it still does not dismiss the fact that the butter has to cook practically all day in order to achieve the correct consistency.  Nonetheless, I did use it, and this is how it went.


I began by essentially making applesauce with a mixture of good saucing apples.  I left the peel on the apples and then removed it by pushing the pulp through a fine mesh sieve.  You could also peel the apples before cooking.  In my hurry to get this in the slow cooker, I failed to take adequate pictures (something I must get better at remembering).  

Once I had the applesauce, I cooked it with sugar and spices in my eency-weency slow cooker (my slow cooker is actually not that small, it is around 3 quarts) until it was thick, dark brown, and smelled incredible.  This is the point that always bothers me.  I have difficulty getting all of the excess liquid cooked out of the butter.  When it mounds up on a spoon, there is often a ring of juice that seeps out from under the mound.  It always seems that no matter how long I cook it, this always happens.  Since this happened to me this year also, I decided to remedy the situation by pouring the cooked butter into a large piece of cheesecloth.  My husband held the cheesecloth while the excess moisture dripped through (good man), and what remained was a thick and not-at-all watery apple butter.  True apple butter success from my personal perspective but not without plenty of effort. 


So, my verdict on the case is this...if you want great apple butter without any excess moisture, you must follow some simple guidelines. 


1.  If using a slow cooker, use one large enough to hold the butter with extra room remaining.  This will speed things up a little (not much, but a little). 

2.  Make sure you cook the butter long enough to reach a thick, moundable consistency.

3.  If you want to get rid of any extra moisture that could seep out of your butter, gently strain the butter through several layers of cheesecloth while someone you love and admire gingerly holds the cloth without dropping it.  This will still leave you with a creamy, but not at all liquidy, butter consistency.


Spiced Apple Butter- adapted only slightly from Canning for a New Generation
makes 5-6 half-pint jars (depending on whether or not you strain the butter)

If you leave the peel on the apples, you will need to use a food mill or fine mesh sieve to remove the peel from the apple pulp. If you do not want to take this step, peel the apples first.

6 pounds apples (good for saucing), peeled or peel left on, cut in 1 in. pieces
2 cups apple cider
1 1/2 cups granulated sugar
2 tsp ground cinnamon
1/2 tsp ground cloves
1/2 tsp ground allspice

Place the apple pieces and cider in a large pot with approximately 3 cups water.  (You may need more liquid as the apples cook, but I found that the 4 cups of water called for created a very thin applesauce that was difficult to cook down in a reasonable amount of time.  Start with 3 and add more if the apples begin to stick).  Boil, approximately 30 minutes, until the apples are soft and begin to separate from the peel.  If you cooked the apples peel on, use a food mill or strainer to separate peel from pulp.  If you peeled them before cooking, puree them in a food processor. 

Pour the apple puree into a large slow cooker and stir in the sugar and spices.  Put the lid on but prop it open on one side with the handle of a wooden spoon.  Cook on low anywhere from 10-12 hours (maybe even more) until the butter is thick, dark, and mounds on a spoon without any liquid seeping out.  If it reaches the thickness desired but still has a little moisture seepage, strain it through several layers of cheesecloth to remove excess moisture. 

You can also cook the butter on the stovetop for several hours, stirring frequently until it reaches the desired consistency.  Be careful as it does spatter. 

When ready, ladle hot butter into hot, sterilized half-pint jars leaving 1/4 inch headspace (I am using the headspace measure required by the National Center for Food Preservation for fruit butters).  Remove air bubbles, adjust headspace, and wipe rims.  Place hot lids and rings on jars and process in a boiling water bath for 10 minutes.  Remove to a towel to cool.  Check seals after 12 hours and store.